
OK. So I know it's not Friday.....things got a little crazy this week....but here I am finally, with a new photo / photoshop prompt.....
Photo Into Pop-Art
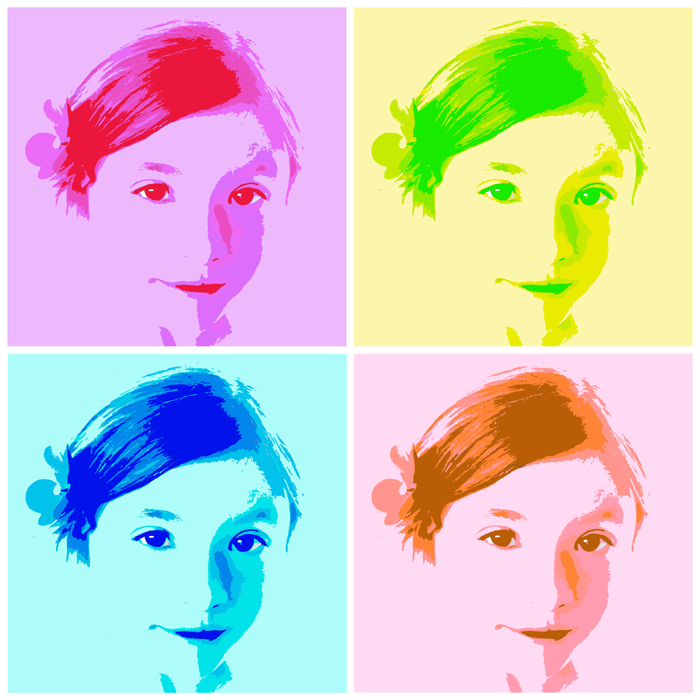
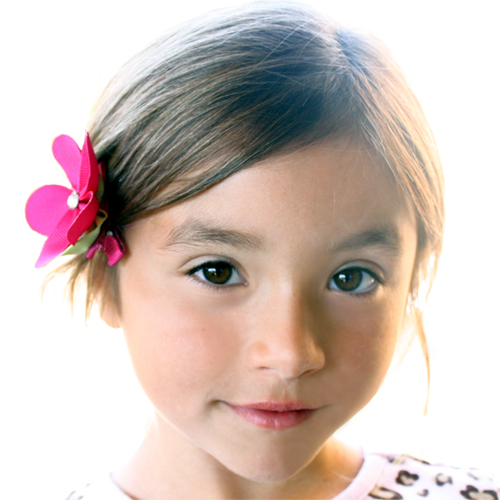
Above is the finished pop-art, and below is my original photo of a sweet little girl I know.....
I wanted to use this mini photoshop project as the prompt for today so I could document my process (for future use) and also share it with you too : )
This idea all started with a friend asking me to design a project for her, and me deciding to try the whole pop-art thing for it. And the first thing I want to mention is that my process with photos/photography and photoshop is just my personal way of doing things and options on what's easiest for me......I am sure that there are lots of other opinions and ways that are different and work great.
- That being said, when I opened up the original photo (above), the first thing I did was to remove the background and create a separate layer for it, so the background and the girls face (the main image) each had a separate layer.
- Next, I had to touch up her face quite a bit as far as adjusting the brightness and contrast, shadows, etc....and found that it would have been easier to make this photo into the desired pop-art if I had taken the photo with either little to no shadows on her skin. So that is what I would do differently if I had to do it over again. To get the finished product I ended up removing all the shadows from the left side of her skin and leaving only minimal on the right side, while at the same time leaving as many shadows as possible in her hair. It was definitely a learning process.
- Once I had the original photo prepped, I desaturated the main image layer (her face)
- Then on that same main image layer, I used the "cutout" (Filter, Artistic, Cutout) filter to create 4 layers of gray. So when the cutout filter tool pop up, you want to choose 4 for the No. of Levels, 2 for the Edge Simplicity, and 2 for the Edge Fidelity.
- From here I was pretty happy with mine, but you may want to play with the levels and or edge simplicity a little more.
- Next, to add the colors I just used the paint bucket tool (because I wasn't sure how I wanted the colors on her face to look), but if you want each shade of gray to to be the same color, it is probably faster to just use "Select, Color Range".
- Last fill in your background layer with whatever color you choose with the paint bucket tool. I kept my background the same color as the lightest shade of her skin so that her neck and shoulders would blend nicely with little effort on my part.
And that's it! It's actually pretty easy and fun!!! If you end up trying it, I would love for you to link me up and/or add it to the Bubblegum Life Flickr group : )
Happy Mother's Day to all you Mom's!!! And I hope you all have a lovely day! I'll be back tomorrow with my finished project.....
Love, Carrie


looks awesome friend!!!!!!!
ReplyDelete